9 January 2019

How I Edit My Blog and Instagram Photos

Multa pyydettiin hiljattain postausta siitä kuinka editoin kuvani blogiin ja Instagramiin, ja koska tällaista postausta en ole tainnut toteuttaa koko blogihistoriani aikana niin täältä tulee! Ensiksi kuitenkin sanottakoon, että en todellakaan väitä olevani kuvien muokkaamisen ammattilainen, vaikka huikea kehitys vuosien aikana onkin tapahtunut. Opittavaa on kuitenkin vielä paljon, ja tällä hetkellä olen itse asiassa vähän sellaisessa välitilassa kun yritän kokeilla hieman uusia juttuja muokkaamisen kanssa ja löytää sen oman tyylini.

I was recently asked to do a post about my editing process for blog and Instagram photos, and as I've actually never done a post like this before here comes! First I want to say though, that I am in no means a professional when it comes to editing although I have gone through quite a development with it. I still have a lot to learn, and actually at the moment I'm in a bit of a limbo state when I'm trying new things with editing and trying to find my personal style with it all. 
lightroom-editing-tutorial

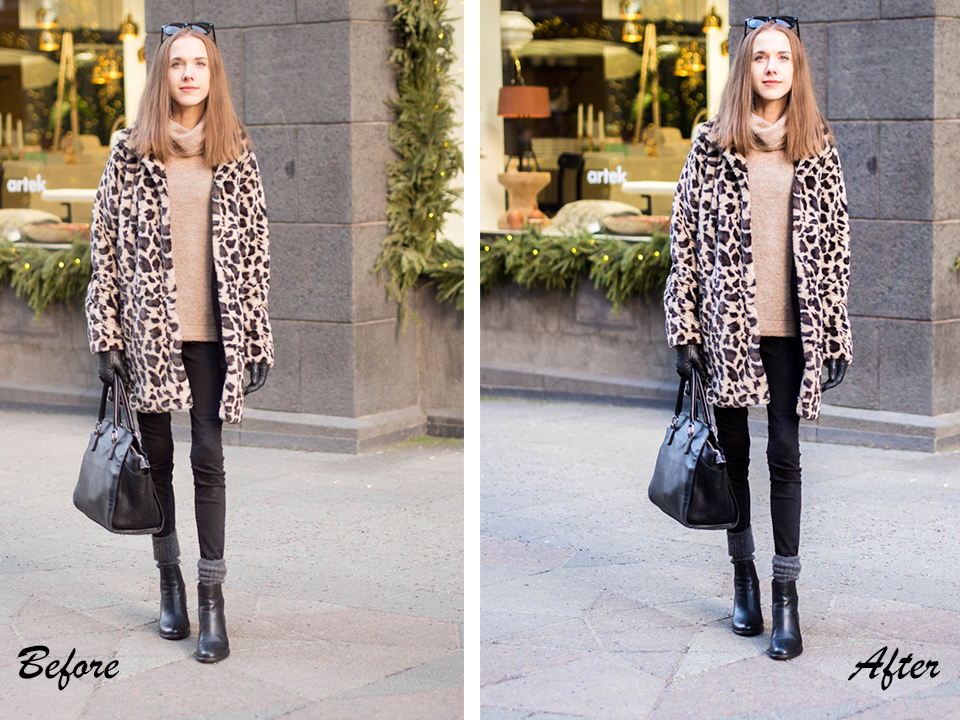
Kuvaan aina raakamuodossa, joka antaa paljon enemmän mahdollisuuksia jälkikäsittelyn suhteen ja muokkaan kuvat oikeastaan pelkästään Lightroomissa. Photoshopia puolestaan käytän useamman kuvan yhdistämiseen ja tekstien lisäämiseen, kuten yläpuolella olevassa before / after -kuvassa. Kuvia editoidessa käyn melkeinpä aina läpi ne samat tietyt kohdat ja käytän samoja "välineitä", mutta se mitä tarkalleen millekin kuvalle teen riippuu täysin kuvasta itsestään. Olen myös viime aikoina tallentanut Lightroomin omia presettejäni jotka helpottaa ja nopeuttaa muokkaamista jonkun verran, mutta koska kaikki samat muokkaukset ei toimi kaikkiin kuviin muokkaan tarpeen mukaan myös jokaista kuvaa yksitellen. Pääsääntöisesti kuitenkin muokkaan kaikista kuvista samoja juttuja, ja tässäpä siis tulee mun editointiprosessi joka näyttää miten ylläolevasta before-kuvasta päästiin after-versioon.

I always shoot in RAW, which gives a lot more opportunities for editing, and I pretty much solely edit my images on Lightroom. I do use Photoshop for combining photos into one and adding text as in the before / after -photo above though. When editing I usually always go through the same steps and use the same tools, but what I exactly do to each photo depends on the individual photo. Lately I've also been experimenting with creating my own presets that make editing a bit more easier and quicker, but as not all of the same edits work for all of the photos I at least fine tune each individual photo when and where necessary. However, generally speaking it's always the same things I adjust in my photos, and so here comes my editing process that shows how the before photo above became the after version. 
  how-to-edit-on-lightroom

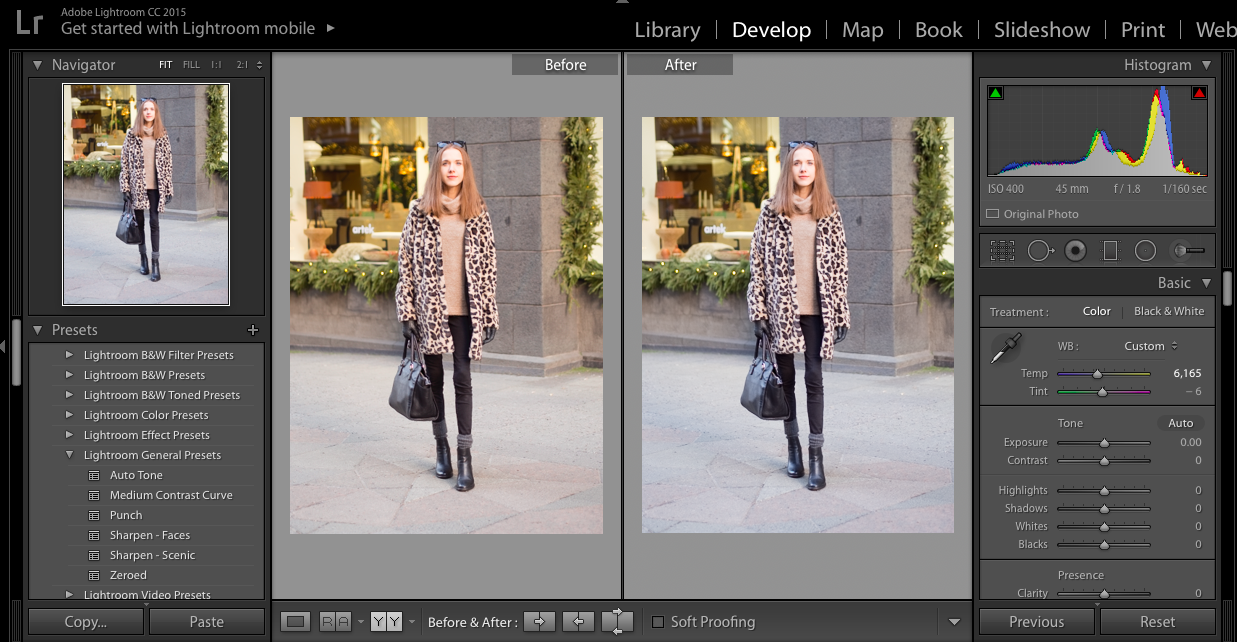
Ensimmäiseksi käsittelyyn pääsee valkotasapaino. Itse tykkään usein enemmän viileä- kuin lämminsävyisistä kuvista, ja siksi siis valkotasapainoakin tulee yleensä vedettyä hieman kylmempään suuntaan. Poikkeuksiakin tosin on, ja kuten sanottu oon viime aikoina kokeillut myös vähän eri juttuja valkotasapainonkin suhteen! Lämmön lisäksi säädän kuvan värisävyä vihreä-violetti -akselilla. Yllä olevassa esimerkissä olen säätänyt lämpötilaa kylmempään ja värisävyä taittamaan enemmän vihreään.

The first thing I edit is white balance. Personally I prefer my photos more cool than warm toned, and so I often tend to adjust the white balance more to the colder side. There are expectations though, and with my recent editing experimentations I've been trying new things with white balance too! Alongside the warmth of the photo I also adjust the tint on the green - purple axis. 
editing-on-adobe-lightroom

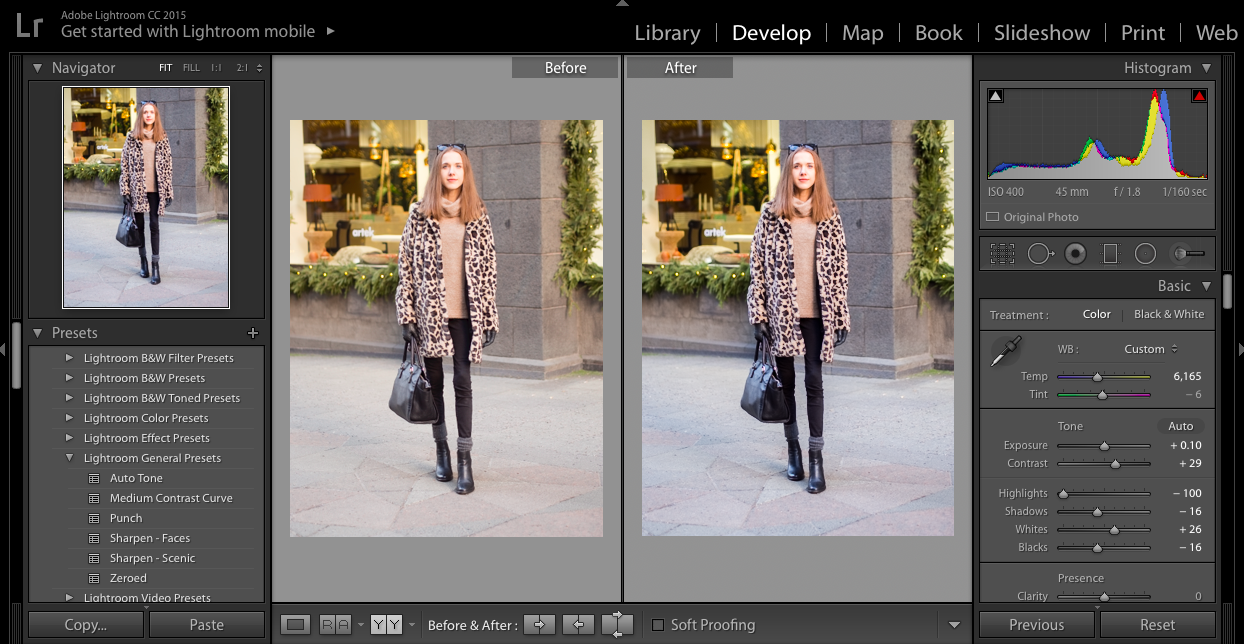
Valkotasapainon jälkeen on vuorossa valotus. Tässä vaiheessa säädän varsinaista valotusta (exposure), kontrastia, kuvan kirkkaimpia ja varjoisimpia kohtia, sekä valkoisia ja mustia alueita. Yllä olevassa esimerkkikuvassa olen lisännyt hieman valotusta ja kontrastia, säätänyt kirkkaimmat kohdat (highlights) nollaan, lisännyt hieman varjoisuutta, kirkastanut valkoisuutta ja tummentanut mustia. Highlights-kohdan säätäminen nollaan asti on muuten juttu minkä teen usein ihan kaikille kuville, sillä se auttaa tuomaan kuvassa olevia pieniä yksityiskohtia paremmin esille.

After white balance it's time for the tone / brightness of the picture. This is when I adjust the exposure, contrast, highlights, shadows, and whites and blacks of the image. In the example above I've added a bit more exposure and contrast, adjusted the highlights to zero, made the shadows more 'shadowy', as well as made the whites whiter and blacks blacker. Adjusting the highlights down to zero is something I often do to all of my photos, as it makes the little details pop more. 
adobe-lightroom-editing-fashion-blogger

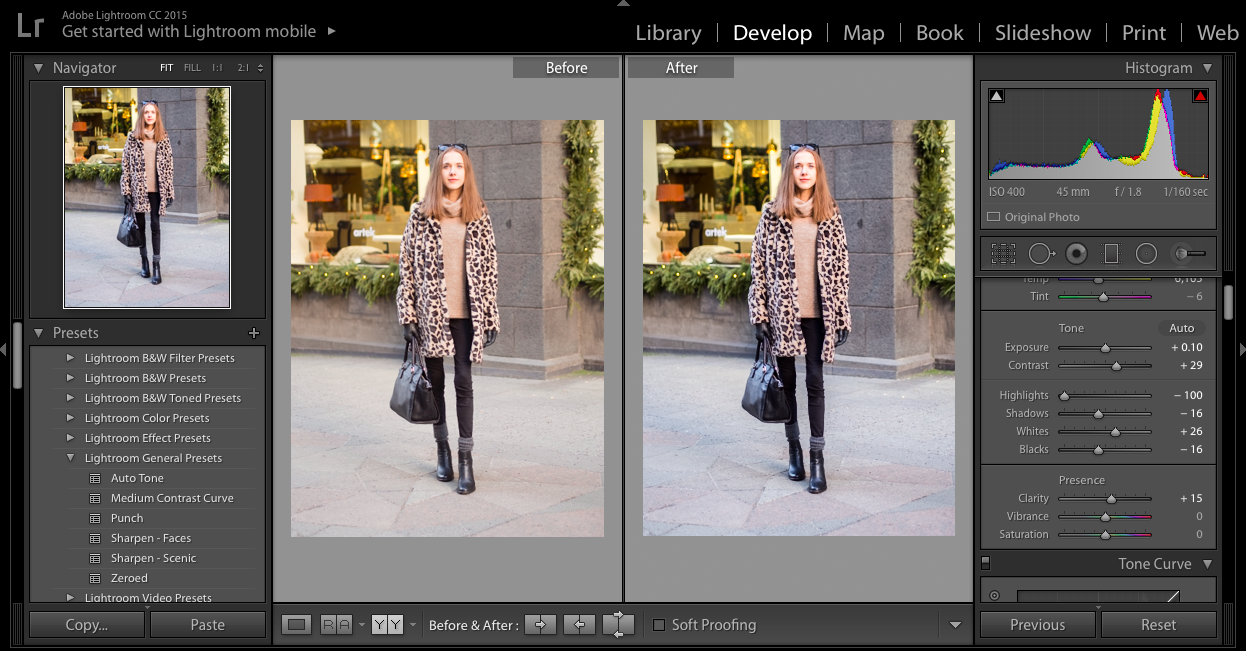
Valotusjuttujen jälkeen muokkaan clarity, vibrance ja saturation -kohtia. Esimerkkikuvassa olen laittanut claritya hieman ylöspäin, mutta en ole itse asiassa muokannut värien kylläisyyttä ollenkaan, Suurinta osaa kuvistani muokkaan kyllä myös värien kylläisyyden suhteen tavalla tai toisella. Viime aikoina oon tykännyt säätää niin vibrance kuin saturation -kohtaakin miinuksen puolelle, mutta tämäkin ihan kuvasta riippuen!

After all things to do with the tone and brightness, I adjust the clarity, vibrance and saturation parts. In the example photo I've put up the clarity a bit, but I've actually not edited the vibrance nor saturation. For the most part, however, I do adjust those two in one way or another. Lately I've been liking to tone down both vibrance and saturation a bit, but this is also totally dependable on each photo! 
how-to-edit-on-adobe-lightroom-fashion-blogger

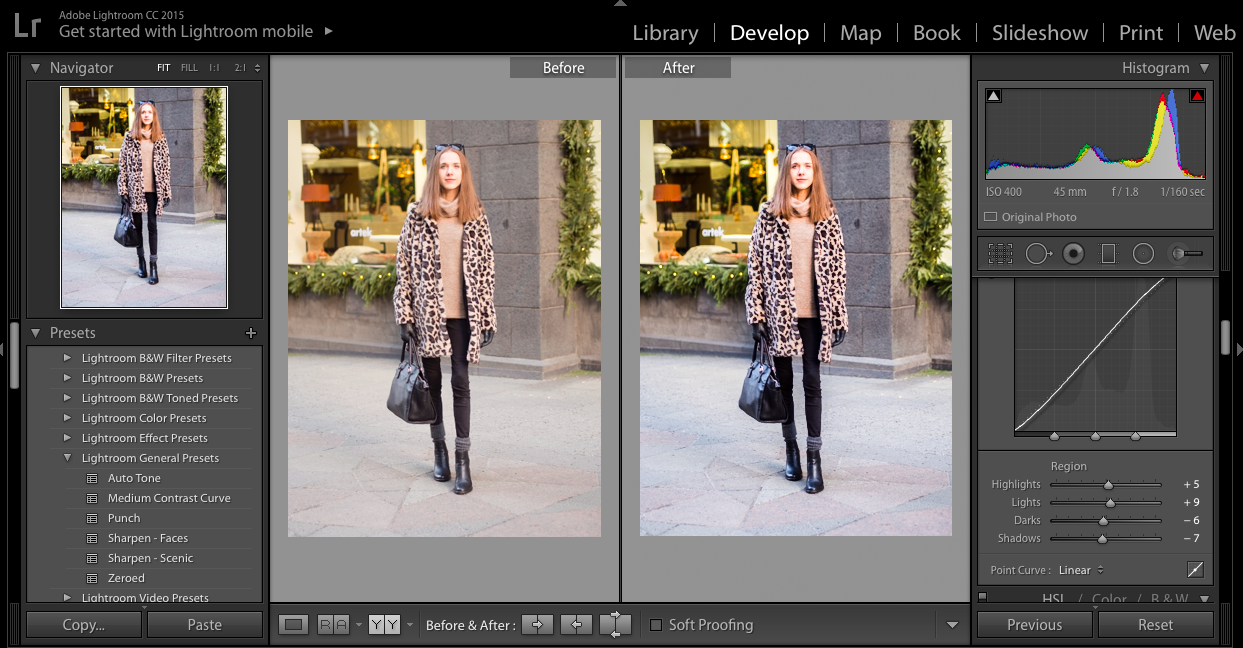
Seuraavaksi on vuorossa sävykäyrä, jonka avulla muokkaan kuvan valoja ja varjoja vielä lisää. Suurin osa mun kuvista toimii parhaiten kun sävykäyrä noudattaa ns. S-linjaa kuten tässä esimerkkikuvassa, mutta välillä esimerkiksi kuvan kirkkaimpia ja valoisimpia kohtia tulee säädettyä vielä alaspäin.

Next up is the tone curve that I use to fine tune the lights and highlights, as well as darks and shadows of the photo. Most of the photos work best when the curve resembles an 'S' like in the above example, but occasionally I like to tone down the lights and highlights even more. 
fashion-blogger-lightroom-editing-tutorial

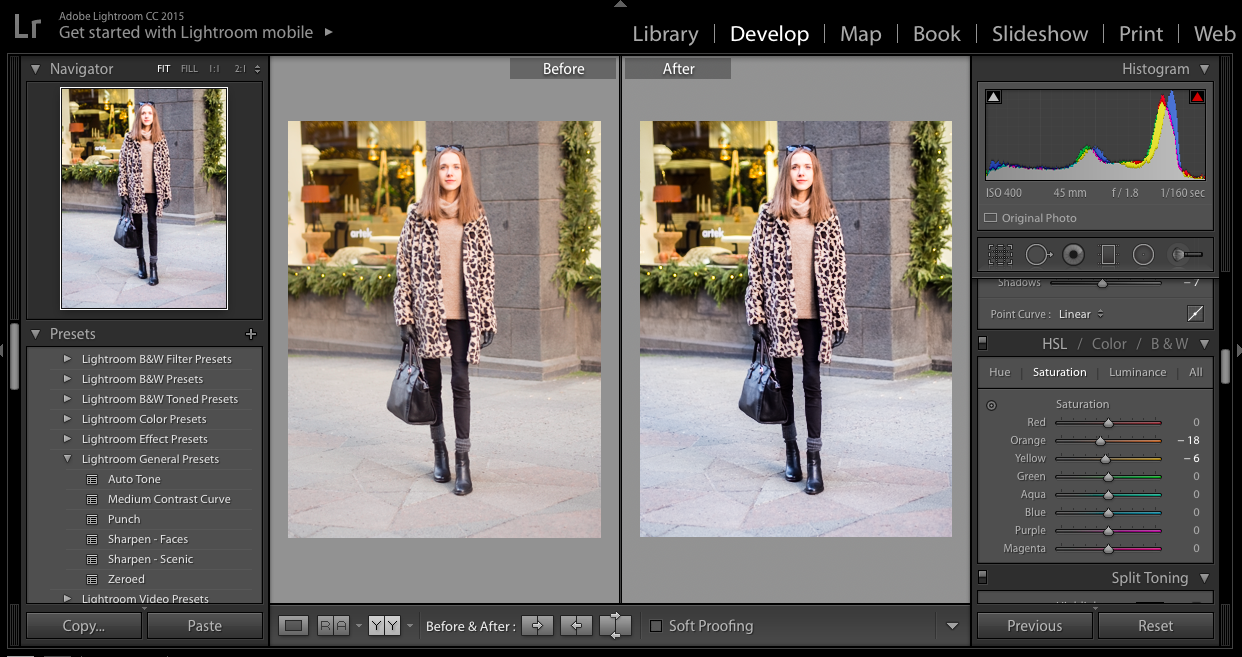
Sävykäyrän jälkeen on vuorossa varsinaiset värit, tosin tätä en ihan joka kerta tee. Koska tykkään kuvistani usein nimenomaan viieläsävyisenä, säädän usein erityisesti keltaisia ja oransseja sävyjä hieman alaspäin, kuten olen tehnyt tässä esimerkkikuvassakin. Tosin kuten todettu, viime aikojen editointikokeilujen myötä välillä alaspäin säätyykin nimenomaan siniset värit.

After tone curve I'm lightly touching on the colours, although this is something I don't do every single time. As I like my photos more cool than warm toned I often tone down the yellows and oranges of the photo like I've done in the example photo here. However, as already mentioned, with the recent editing experimentations I've sometimes been toning down the blues instead. 
how-to-edit-on-adobe-lightroom-fashion-blogger

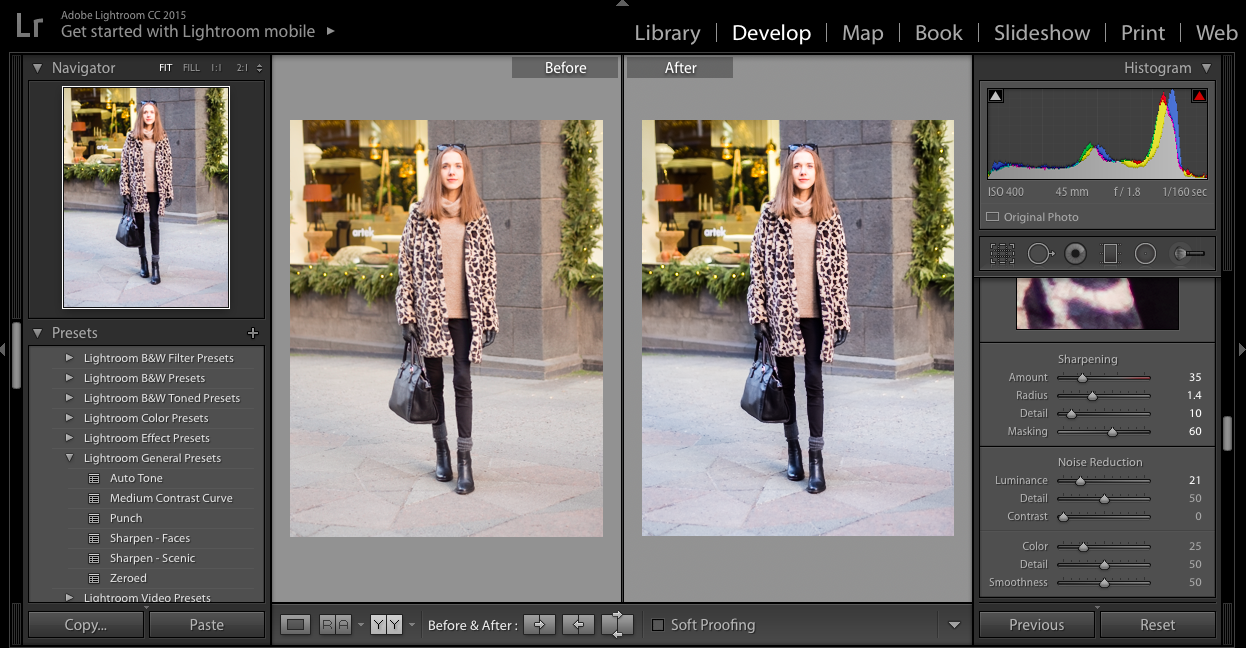
Viimeisenä kohtana mun editointiprosessissa on vielä terävöitys ja kohinan vähentäminen. Usein lisään hieman terävyyttä, ja noise reduction -kohdan luminance-työkalulla häivytän kuvan kohinaa, joka on usein ongelma erityisesti näin pimeään talviaikaan kuvatessa kun kuvausolosuhteet on vaatineet suurempien ISO-lukujen käyttöä. Nimenomaan pieni terävöitys ja kohinan vähentäminen on tapahtuneet myös tälle kuvalle.

Instagram-kuvani muokkaan puolestaan puhelimen Lightroom-appilla, ja sinnekin olen tallentanut muutamia omia presettejä valmiiksi. Lähetän siis ensin koneella Lightroomissa muokkaamani blogiin tarkoitetut kuvat puhelimeen, ja muokkaan niitä vielä uudelleen ennen Instagramiin julkaisemista. Puhelimen Lightroomissa säädän oikeastaan samoja juttuja kuin koneellakin tehdessä, mutta en käy kuitenkaan läpi koko prosessia uudelleen. Välillä myös lisään mielestäni Instaan paremmin sopivaa rosoisuutta grain-työkalulla, mitä en blogikuville tee.

Siinä siis mun editointiprosessi kokonaisuudessaan! Kokeilemalla ja tekemällä oikeasti oppii parhaiten, ja kuten jo aiemmin sanoin niin itselläkin on muokkausasioissa vielä paljon varaa kehittyä ja kehittää omaa osaamista. Toivottavasti postauksesta kuitenkin oli apua ja iloa joillekin teistä, laittakaa vielä kommenttia tulemaan jos jäi kysyttävää!

The last step in my editing process is sharpness and noise reduction. I usually add up the sharpness a little, and use the luminance tool in noice reduction to reduce the noice in the photo. This is especially useful during this time of the year when the dark winter shooting circumstances require using higher ISO numbers, which then leads to more noise in the photo that you take. Sharpening and noice reduction is exactly what I've done in the photo above too.

As for my Instagram photos, I use the Lightroom app on my phone for those and I've also been saving my own presets on there too. So first I send the photos edited on desktop Lightroom that are meant for the blog to my phone, and then edit them on the Lightroom app before publishing them on Instagram. With the app I pretty much adjust the same things as when editing with the desktop version, but I don't go through the whole process again. Sometimes I also like to add a bit more grain to my Instagram photos, as I feel like the grain looks better on Instagram than on actual blog photos. 

So there's my editing process in its entity! The best way to learn really is just by trying and doing, and like I said in the beginning I still have a lot of room to learn and develop my own skills when it comes to editing. But I hope you found this post useful and helpful, let me know if you've got any remaining questions!

Find Me:
SHARE:

7 January 2019

Headband: Cute & Elegant with Blair Waldorf Vibes

what-would-blair-waldorf-do-winter-outfit-with-black-silky-headband

Hiuspannat on nyt viime aikoina olleet todella pinnalla, ja itsekin menin ja ihastuin tähän ysäsrin ykkösasusteeseen ihan kunnolla. Pantoja tuli tosiaan käytettyä paljon lapsena, ja äidin lisäksi yllätyin hieman itsekin kun ilmoitin että mulla on missiona etsiä käsiini (tai no, päähäni) musta silkkipanta.

Headbands have been enjoying a huge popularity as of late, and personally I only went and fell in love with this 90s number 1 accessory too. I used to wear headbands a lot as a child, and alongside my mother I also surprised myself a bit when I declared that I had made it my mission to find a black silk headband. 

scandinavian-fashion-blogger-outfit-with-teddy-coat-and-silk-headband

Tällaisia silkkisiä solmupantoja on kaupat pullollaan juuri nyt, mutta omani päädyin ostamaan KappAhlista. Sovittelin silkkipantoja muutamissa muissakin kaupoissa, mutta ainakin Glitterin ja H&M:n pannat olivat omaan päähäni ja makuuni liian leveitä ja "hallitsevia". Mutta vinkkinä siis että niistäkin kaupoista löytyy, mikäli siellä joku muukin vielä etsii hiuspantaa! Pantojen lisäksi oon nyt kyllä muutenkin ihastunut kaikenlaisiin erilaisiin hiuskoristeisiin, sillä ne on jotenkin niin helppo ja kiva tapa asustaa lookeja. Erityisesti vielä viimeisimmän kampaajalla käynnin ja hiusten leikkaamisen jälkeen on ollut kiva panostaa hiuksiin muutenkin vähän enemmän, usein nimenomaan jonkun pienen hiusasusteen avulla. Hiusasusteisiin liittyen on muuten tulossa postausta vielä myöhemmin, eli pysykäähän kuulolla sen suhteen!

These kind of silk headbands are everywhere right now, but I eventually found mine in KappAhl. I tried on a few different ones in different stores, but they were all too wide and 'dominant' for my liking. But just as a tip, at least H&M has some silk headbands in right now if there's someone still looking for theirs! It's actually not only headbands I've been loving lately, but all kinds of hair accessories too. They're just such an easy and nice way to accessorise your looks. And especially ever since getting my hair cut shorter again a few weeks ago it's been nice to put more effort into my hair again otherwise too, often exactly with a little hair accessory of some kind. There's going to be a blogpost about hair accessories coming soon by the way, so stay tuned for that! 

teddy-coat-and-headband-winter-outfit

KappAhl headband // Primark coat // Second hand jumper // Asos jeans // Asos necklace // Vagabond shoes

Shop the Look

black-silky-headband-with-bow-detail
Photographed by: Aada K. 

Pantabuumi käy nyt tosiaan kuumana eikä mikään ihme, sillä kyllähän hiuspannat lisää melkeinpä asuun kuin asuun sen viimeisen kaivatun yksityiskohdan. Pannat on samaan aikaan jotenkin tyttömäisen söpöjä ja naisellisen elegantteja, eikä pantojen luomista Blair Waldorf -viboista pääse mihinkään. Ja tällainen söpö mutta elegantti Blair Waldorf -look kelpaa kyllä mulle!

Onko siellä muita hiuspantoihin ihastuneita, vai jätättekö ne mielummin sinne 90-luvulle?

The headband craze really is going strong right now, and no wonder since headbands add that tiny little missing detail to finalise almost any outfit. They're cute and elegant at the same time, and you just can't deny the Blair Waldorf vibes you get from wearing headbands. And this kind of cute but elegant Blair Waldrof look is fine by me!

Anyone else loving headbands at the moment, or do you think they should be left to the 90s?

Find Me:
Postaus sisältää affiliate-linkkejä // This post contains affiliate links
SHARE:

4 January 2019

New Year, Fresher Hair

kampaamo-helsinki-kamp32

Yhteistyössä // in collaboration with Kamp32

Osa siellä ruudun toisella puolella onkin ehkä jo huomannut, että melkein heti Suomeen lomailemaan tullessa mulla lyheni tukka taas aika reippaasti. Kävin tosiaan jälleen laittamassa tukan kuntoon joulua ja vuoden vaihdetta varten Kamp32:n Tiialla, jonka käsittelyyn oon luottanut jo pidemmän aikaa. Kamp32 tarjoaa myös teille lukijoille 15% alennuksen kaikista palveluista maaliskuun loppuun asti kun mainitsee varauksen yhteydessä 'Pinja K'. Lukekaapa eteenpäin, mikäli haluatte tietää mitä mun hiuksille tällä kertaa oikein tehtiinkään!

As some of you might have noticed, almost right after coming to Finland for my Christmas holidays I go my hair shortened quite a bit again. I went to get my hair fixed in time for Christmas and the new year at Kamp32 again where Tiia, in whose hands I've been trusting for quite some time already, worked her magic on my hair again. Read on if you want to know what I had done this time!

helsinki-kampaaja-alennus-kamp32

Viime kerralla tukkaan tehtiin leikkauksen lisäksi Wellan Reverse-hoito, mutta tällä kertaa freshattiin vähän omaa väriä ja erityisesti latvaa Wellan Glossing-kiiltosävytyksen avulla. Kiiltosävytystä voi verrata kevytväriin ja se siis myös haalistuu luonnollisesti ajan myötä, mikä sopii ainakin mulle paremmin kuin hyvin sillä en enää ikinä halua lähteä siihen muutaman vuoden takaiseen värjäysrumbaan. Omaa väriä on kuitenkin kiva nimenomaan kirkastaa ja mun kohdalla sävytys tehtiin erityisesti taittamaan latvan keltaisuutta enemmän tuhkaan päin. Lopputulos onkin todella luonnollinen ja huomaamaton, eikä värin muutosta oikeastaan huomaa ellei siitä erikseen sano. Tällainen kevyt värin freesaus voidaan siis tehdä myös värjäämättömään tukkaan tai korostamaan omaa luonnollista hiusväriä helposti ja nopeasti, sillä sävytysaineen annetaan vaikuttaa vain noin 15 minuuttia sen sijaan että väri päässä pitäisi istua useamman tunnin ajan. Nimensä mukaisesti Glossing-sävytys myös tekee tukasta kiiltävän ja sileän käsittelyn jälkeen, sillä värimassaan sekoitetaan mukaan Wellan SP Color Save -sarjan hoitoainetta. Lisääntyneen kiillon ja sileyden huomasikin mun tukassa heti käsittelyn jälkeen, ja alla olevassa ennen/jälkeen -kuvassa tulee myös hyvin esille miten väri ei taita enää ollenkaan keltaiseen.

Last time alongside cutting my hair I also got the Wella Reverse treatment done, but this time my colour had a little fresh up with a Wella Glossing treatment. The Glossing treatment can be compared to a colour toner and so it fades naturally with time. That works really well for me and my hair since I never want to be caught in that colouring cycle again that I was in a few years ago. But it's nice to brighten and freshen my own colour anyway, and in my hair the treatment worked especially well to reduce the yellowness of the colour and to make it more ashy instead. The final result is really natural and goes almost unnoticed if not mentioned about specifically. This kind of treatment that only freshens the colour can be done even if the hair has never been coloured before, and it only takes about 15 minutes so there's no need to sit and wait for hours while the colour does its thing. As the name suggests, the Glossing treatment also makes the hair shinier and smoother which is thanks to the Wella SP Color Save conditioner that is mixed in with the actual treatment product. In the before/after photo below you can see how after the treatment my hair is a lot more glossy and smooth, and how the colour has gone from yellowish to more ashy. 

haircare-wella-glossing-treatment

wella-sp-luxeoil-shampoo-conditioner-hair-oil
kampaamo-helsinki-alennus-kamp32

Tiia antoi mulle myös mukaan muutamat tuotteet joilla hoitaa uutta tukkaa, ja näitä Wellan SP Luxeoil shampoota, hoitoainetta ja hiusöljyä oonkin käyttänyt nyt viime viikkojen ajan. Shampoo ja hoitoaine molemmat hoitavat ja paikkaavat hiusten keratiiniproteiinia ja tekevät tukasta pehmeämmän ja sileämmän, joten tää sarja sopii loistavasti oman karhean ja luonnonkiharan hiuslaatuni hoitoon. Luxeoil -hiusöljy puolestaan hoitaa, rakennepaikkaa ja jälleenrakentaa hiusta sisältämiensä argan-, jojoba- ja manteliöljyjen avulla. Useammasta öljystä huolimatta tämä hiusöljy itse asiassa yllätti keveydellään, sillä monet muut aiemmin käyttämäni erityisesti argan-öljyä sisältävät hiusöljyt ovat usein olleet paksuja ja raskaita. Hiusöljystä löytyy myös lämpösuoja, joten ainakaan tukkaa föönatessa ei erillinen lämpösuoja ole välttämättä tarpeen. Öljyn pitäisi käytännössä suojata hiusta myös lämpörautojen kuumuudelta, mutta lämpösuojatuotteiden käyttö rautojen yhteydessä on mulle niin selkärankaan iskostettu että niiden kanssa kyllä käytän vielä erikseen lämmöltä suojaavaa suihketta, ja samaa suositteli Tiiakin.

Tiia also gave me a few products with which to take care of my updated hair, and I've been using these Wella SP Luxeoil shampoo, conditioner and hair oil during these past few weeks. The shampoo and conditioner both treat and repair the keratin protein of the hair and make the hair softer and smoother, so this range suits well for caring for my naturally curly and dry hair. The hair oil from the Luxeoil range comprises of three oils: argan, jojoba and almond, and so it treats, repairs and reconstructs the hair. The oil actually surprised me with how light it is! Many of the hair oils containing argan oil especially are usually quite thick and heavy, whereas this one doesn't have a heavy feeling to it at all. The oil also protects the hair from heat so technically there's no need for additional heat protectant at least when blow drying. However, I'm really careful with protecting my hair from heat when using straighteners or curlers so I still do use an additional heat protectant spray whenever I'm styling my hair with a hot tool, and Tiia recommended this as well.

wella-glossing-treatment-sp-luxeoil-kampaaja-helsinkihelsinki-kampaamo-kamp32-wella-glossing-treatment
Photographed by: Aada K.

Kiitos jälleen Kamp32 ja Tiia tukan freeseuksesta! Uudella freshillä lookilla on hyvä lähteä uuteen vuoteen.

Thank you again Kamp32 and Tiia for my hair fresh up! With this freshened up look the new year gets a good start. 

Find Me:
SHARE:

2 January 2019

2019 Goals

leopard-print-faux-fur-coat

Mahtavaa uutta vuotta 2019 tyypit! Toivottavasti teidän uuden vuoden aatto kului mukavissa merkeissä ja olette saaneet hyvän startin tähän vuoteen.

Mä en ole mikään uuden vuoden lupausten suurin fani ja niinpä en niitä tänäkään vuonna tee. Sen sijaan tykkään asettaa itselleni pikemminkin tavoitteita joita kohti pyrkiä, ja vaikka "uudesta vuodesta ja uudesta alusta" voidaan olla montaa mieltä, niin kyllä tammikuussa vaan on ihan eri tavalla sitä uuden alun tuntua kuin vaikkapa huhtikuussa, ja sen takia erityisesti näin vuoden alussa tulee mietittyä että mitäs sitä tulevalta vuodelta oikein haluaakaan. Koska faktahan on se, että vuodesta tulee juuri sellainen kuin minkä itse siitä teet. Totta kai elämä yllättää aina välillä ja on asioita joihin ei itse voi vaikuttaa, mutta aika paljon me voidaan myös itse vaikuttaa oman elämämme kulkuun.

Happy new year 2019 peeps! I hope your NYE celebrations went well, and you've gotten a good start into this new year.

I'm not a huge fan of New Year's resolutions and so I won't be making any this year either, but instead I like to set myself some goals towards which to strive. "New year new me" surely divides opinions, but personally I think that January has a totally different feeling of a fresh start than e.g. April does, and so it's especially at the start of each new year when I like to think about what I want from the coming year. And the fact is that each year is what you make of it. Of course life throws surprises our way and there are some things that you just don't have control over, but most of the time we really do have the control over our own lives. 

winter-outfit-with-leopard-print-coat

Itse asetan vuodelle 2019 seuraavat kymmenen tavoitetta, jotka saavat ohjata toimintaani tänä vuonna.

1. Ystävyyssuhteiden ja sosiaalisen kanssakäymisen vaaliminen.

2. "Älä murehdi viittä minuuttia kauempaa asiaa, jolla ei ole viiden vuoden päästä enää merkitystä."

3. Sano kyllä, vaikka pelottaisi tai jännittäisi.

4. Pidä oma kokonaisvaltainen hyvinvointi ja terveys prioriteettina - niin fyysinen, psyykkinen kuin sosiaalinenkin.

5. Tee parhaasi koulujutuissa, mutta muista että nimenomaan oman parhaan tekeminen riittää.

6. Pidä hyvä draivi ja motivaatio yllä blogin ja Instagramin suhteen.

7. Älä vertaile itseäsi muihin millään elämän osa-alueella.

8. Lue enemmän uutisia ja pidä yllä yleissivistystä.

9. Hoida ikävätkin asiat nopeasti alta pois.

10. Lue enemmän kirjoja.

These are the ten goals I'm setting myself for 2019, and these will be my guidelines of how I'm living my daily life in 2019.

1. Cherish friendships and social interactions.

2. "Don't waste over five minutes getting upset about something that won't matter in a five years time."

3. Say yes, even to things that feel a little scary and intimidating at first.

4. Make my own overall wellbeing and health a priority - whether that's physical, mental or social.

5. Do my best with uni work, but remember that 'my best' is all I can do and it's enough.

6. Keep up the good drive and motivation with blog and Instagram.

7. Don't compare yourself to others in any aspect of life.

8. Read the news more and keep up with common knowledge.

9. Get the unpleasant things on the to do list over and done with quickly.

10. Read more books.

fashion-blogger-outfit-inspiration-leopard-faux-fur-coat

Ellos coat (gifted) // Ellos jumper (gifted) // ASOS jeans // Steve Madden shoes // Ray-Ban sunglasses

Shop the Look


faux-fur-leopard-print-coat-scandinavian-fashion-blogger-outfit-inspiration
how-to-wear-leopard-print-faux-fur-coat
Photographed by: Aada K.

Viimeisenä ja tärkeimpänä tavoitteena/toiveena haluan kuitenkin asettaa itelleni sen, että olisin onnellinen, terve ja motivoitunut - ja siihen kaikkeen nimenomaan ylempänä listatut tavoitteet vaikuttaa!

Onnea, rakkautta ja menestystä teidän kaikkien vuoteen 2019!
P.S. Jos ette vielä lukeneet mun mietteitä vuodesta 2018, niin sen postauksen löydätte täältä.

My last and most important goal/wish, however, is that I'd be happy, healthy and motivated - and that's exactly what the goals listed above will contribute to!

Wishing you all joy, love and success for 2019!
P.S. If you didn't read about my reflections on 2018 yet you'll find the post here. 

Find Me: 
Bloglovin, Instagram, Facebook, Twitter, Pinterest, Youtube, theblogjungle
Postaus sisältää affiliate-linkkejä // This post contains affiliate links
SHARE:

31 December 2018

Favourite Outfits from 2018

73 - niin monta asupostausta tuli julkaistua blogissa vuoden 2018 aikana. Uskallan melkeinpä väittää, että tuo numero on myös tämän mun yli 5-vuotiaan blogin ennätysmäärä asupostausten suhteen. Kokosin tähän postaukseen 12 mun suosikkiasua kuluneelta vuodelta, siis yksi joka kuukaudelta! Tätä koontia tehdessä ja näitä kuvia katsoessa muuten huomasin erityisen hyvin sen, kuinka mulla on vaatekaapissa ihan selkeästi ne lempparivaatteet ja suosikkielementit. Samat tietyt jutut toistuu näissä mun suosikeissa asusta ja kuukaudesta toiseen, mutta se myös toisaalta osoittaa sen että ainakin tiedän mistä tykkään sekä sen, että vaatteet on tehty käytettäväksi moneen kertaan. Tässäpä siis nämä mun suosikkilookit vuodelta 2018, kertokaa mikä on teidän lemppari! Postauksen nimeä klikkaamalla pääsette vielä katsomaan lisää kuvia jokaisesta asusta.

73 - that's the number of published outfit posts here on the blog during 2018. I even dare to say that that is the highest number to date when it comes to published outfit posts within a year during these a bit over 5 years that I've been sharing my outfits and life here on Pinja K. In this post you'll find 12 of my favourite outfits from this past year, one from each month. When putting this post together and looking at these photos I also noticed particularly well how I have the certain favourite items and elements in my wardrobe. Certain things repeat themselves in these favourite looks of mine, but at least that shows that I know what I like and that clothes really are made to be worn over and over again. So here goes, these are my favourite outfits from the past year, let me know which one is your favourite! Clicking the post title under each photo takes you to the original post with that outfit where you can see more of each look.


fashion-blogger-outfit-inspiration-camel-coat

Helmikuu // February: The 'Go-With-Everything' Boots

outfit-inspiration-polka-dot-dress-faux-fur-and-baker-boy-cap

Maaliskuu // March: Spring Tiredness and Polka Dots

fashion-blogger-outfit-inspiration-distressed-denim-and-leather-jacket-white-shirt

Huhtikuu // April: Edgy & Feminine

outfit-with-distressed-denim-skirt-white-top-and-checked-blazer


fashion-outfit-inspiration-floral-dress-and-leather-jacket

Kesäkuu // June: Florals and Leather

fashion-blogger-summer-outfit-striped-dress-cult-gaia-ark-mini-bamboo-bag

Heinäkuu // July: "It has pockets!"

outfit-inspiration-leopard-print-top-and-mom-jeans


fashion-outfit-inspiration-leopard-print-skirt-cashmere-jumper-leather-jacket


fashion-blogger-autumn-outfit-inspiration-camel-coat-check-trousers-studded-ankle-boots


fashion-blogger-outfit-inspiration-leopard-top-mom-jeans-blazer-camel-coat


fashion-blogger-outfit-winter-whites-faux-fur-jacket-snakeskin-print-ankle-boots

Joulukuu // December: Winter Whites at Golden Hour

Nyt toivotan vielä kaikille oikein ihanaa uuden vuoden aattoa ja mahtavaa alkua vuodelle 2019! ♥︎

Wishing you all a lovely New Years Eve and a great start to 2019! ♥︎

Find Me:
SHARE:
Blogger Template Created by pipdig